TRLE Editor
tutorial for the official level editor
Lesson Three
Now it's time to say something about how to start your level in the game. Also, some information will definitely come in handy about Lara's options and some other editor and engine settings and tweaks.
How to run the game :
In your project, the object "Lara" must be on the map (in one of the rooms). Then in the menu
"Project" ->
"Output Wad" you create or overwrite a file with the ending TOM. Remember!
The name of this file must always match the name of the objects! When your TOM is created, run it
"tom2pc.exe",
press the "Add" button to get your TOM into the sheet and run "Build All". When the creation of the TR4 file is complete
(*** Build All Complete ***), run the game "tomb4.exe" and choose a level. (name again according to objects, TOM, TR4...)
Lari options :
Jump from place - 2 squares ; with start-up - 2.5 squares; from a place with a catch - 2 whole (gets caught by the third);
with run-up and capture - 3 whole (captures the fourth); when long jumping, he jumps 4 levels from a distance of 1 square.
Back somersault - 2 squares; somersault to the side - 1.75 squares;
Climbs up to 7 levels, climbs into plain at least 2 levels; narrow space for climbing on all fours must be at least 4 levels high;
glides from 3 bevel levels; jumps from ladder to ladder at the opposite distance 2 squares;
from the pole, if there is enough space, he will somersault to the second square (i.e. he will jump over one and land exactly on
the edge of the second - of course, it depends on the location of the hole), if there is a shortage, only on the square behind it.
These are just basic distances and most of them depend on shape, height, etc.
For example I haven't gotten to the exact distances for the rope yet. I just do it by experience :)
OCB or Object Code Bits :
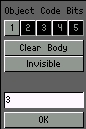 It is a form of programming an object, if it has more possibilities of application. May contain startup information,
or for the Lara animation. You call up the OCB dialog after selecting the given object with the "O" key. There you can click a button
"Invisible", which determines whether the object will be visible at startup or not. Some objects (eg enemies) are not
can be seen automatically, but for example with waterfalls (if Lara wants to start them later) it is necessary to enter "Invisible" specially,
otherwise they will be there from the beginning of the game, just motionless. It is also used for pickups (that is, anything that can be picked up) hidden in
vases, or hidden, intended for later discovery (triggered by e.g. Lara)
It is a form of programming an object, if it has more possibilities of application. May contain startup information,
or for the Lara animation. You call up the OCB dialog after selecting the given object with the "O" key. There you can click a button
"Invisible", which determines whether the object will be visible at startup or not. Some objects (eg enemies) are not
can be seen automatically, but for example with waterfalls (if Lara wants to start them later) it is necessary to enter "Invisible" specially,
otherwise they will be there from the beginning of the game, just motionless. It is also used for pickups (that is, anything that can be picked up) hidden in
vases, or hidden, intended for later discovery (triggered by e.g. Lara)
The lower part of the OCB dialog is equipped with a text line where you can enter a number,
unless we want to use the object in a standard way. What numbers can be entered and what it will do,
it is written in the general schedules for each object.
Flip rooms :
It is used for surface changes in the room that cannot be achieved by standard methods.
It is possible to change the grid, textures, ladders, ceilings to handle, boxes, doors, commands, water...
Unable to add objects. First, model the room that will be first (before launch).
Then press the "F" button under the minimap and define a number next to it (each transformation must have its own - i.e.
if two or more rooms are the same, they will be changed simultaneously with one command). The background will turn black for you and
that means you are in post-transformation mode. Now transform the room to your liking. You can switch between these modes
ALT+F.
You can recognize a flipped room by the depressed (black) button F. The command to start is then formed:
TRIGGER for FLIPMAP and in the upper corner of the dialog you enter the flipping number (same as for the button).
Relative positions of rooms and doors :
We have already created several rooms and we want to somehow connect them.
There are two types of connection: ceiling and side, i.e. that we can connect the room in front of the wall or the floor/ceiling.
Mutual position is always important. The location of the room is set by pluses and minuses in Room. The location is written on the status bar, e.g.
"Floor: 10 Ceiling: 27". So here we have the range of levels in which the room is located. If we set up the second room so that
so that they touch walls eg "Floor: -2 Ceiling: 12", we can connect them with a wall. In 2D Map mode, we will have these rooms
next to each other so that they touch (but do not overlap!) (they move by holding the right button and then dragging)
(with the left button you switch the rooms in which you work), in one of them we mark the part of the wall that we want to connect
and we put the black button "Door". On the map at the top left, this connection point will be marked in black and you will skip it
to the room you linked to.
Attention! The wall you are connecting must be taken according to the 2D map, therefore also the small map on the top left.
When viewing in 3D, the position of the room is distorted and confusing.
Another connection is the ceiling - floor. In this case, the floor of one room must touch the ceiling of the other, e.g.
"Floor: 26 Ceiling: 35" and "Floor: 18 Ceiling: 26". Then overlay these rooms in the 2D map and connect them so that
that in the upper room mark the floor and put "Door".
Attention! When connecting rooms ceiling - floor, you must always connect from the upper room!
Water :
Water is created in the room with the "W" button under the minimap. Outline the room for water believability
into the right color (water always brightens the room a little and brings the color out of tune). The layer surface is made using Toggle Opacity 2,
which will create a texturing membrane on the door (the door between the room with water and the room above must be marked before this).
Texture this surface with a water texture with "Transparent" mode on (black becomes transparent).
Note: Keep "Draw Doors" turned on to see the effect and to texture at all (Face Edit I don't need to remind).
Where a transparent texture is given, it will turn yellow without Face Edit. To see the surface from both tents,
you have to texture both sides like this :o). Check if the water textures are animated:
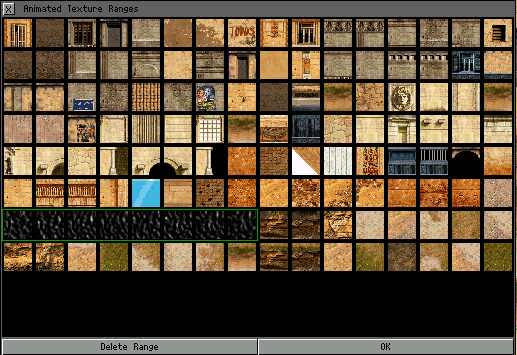
Under the textures, the "Animation Ranges" button, there you mark the right first water texture and mark the others with a stroke,
until you get a continuous red band around them, then green.
Level cosmetics :
This term refers to all changes not directly related to the basis of the game.
If we start with Lara, we can give her different clothes, today archives of various
models mostly made by amateurs for download. Information about its appearance is contained in the LARA_SKIN object and if you own it
one of the wad editing programs, it is not a problem to replace something like that. If the program also supports extracting objects from TR levels,
it is also possible to take the appearance of Lara from earlier Tomb Raiders. I want to draw your attention to the fact that most amateur creations
it looks very unprofessional, so I wouldn't recommend this step for creating at a higher level. Of course,
if you want to do something like this yourself, you should always redesign with reason and not try to overpay for everything with originality.
The loading image when starting the game can be changed to any 800x600 BMP image named "load.bmp". Just copy it directly into the TRLE folder and overwrite the original one. I think it's a very nice diversion and a good one at that as an initial lure for your players.
The Name of the level is changed by the script, by editing "script.txt" and "english.txt" in the "Script" folder. You need to change the name in both because the two files are dependent on each other. For example, if you use coastal.wad/tom/tr4 etc. in the Coastal Ruins script, you can change it to "My level". Then you have to do the same even in English (be careful to write it exactly the same!). then when you run "English Script.bat", everything will convert itself to .dat files. In theory, these files should copy themselves into the folder above it, but it doesn't work for me at all, so if it does, it copies everything (script.dat and english.dat) to the TRLE folder, or overwrite it.
The loading image at the start of the level, respectively at load and exit can only be changed, if you have "FlyCheat= ENABLED" written in the script (if not, rewrite DISABLED to ENABLED :o) ). In the game, you and Lara go where you want, take a screenshot (what you see on the screen is valid, not where Lara is looking!) and press F1. you will see the numbers in the top corner of the screen. As they go from the top, you describe them and then write them in the script for the LoadCamera= column. Recode the script and, if necessary, copy it.
Young Lara can be set in the script by creating a new line with "YoungLara= ENABLED". Remember that the wad must contain a LARA_SKIN object in the shape of a little Lara. If you mess up, there are funny graphic consequences (little Lara with one pigtail, or a big one with braids going somewhere to infinity, etc.) :o).
Changing the logo in the main menu is a bit more complicated. First you need to create your logo size 512x256, while black will represent a transparent color (if you want to use black somewhere so that it is visible, so just lighten her up a bit, nothing will be recognized and she won't shine). Then save it in .raw format in the "Logo" folder. Run logo.bat there and it should do the rest for you. But it happened to me that on some operating systems it didn't work. I don't know if it was that or something else, but hopefully it will go smoothly for you.
Tips and Tricks :
Trigger Triggerr
Used to "freeze" the command on which this object stands. Only after you start this TT object,
he triggers the activity option of the command he is standing on. It's a good representation of saving yourself some flipping.
No Collision
 You must have noticed that you don't have to make only "holes" or doors between rooms rectangular or square.
Diagonal transitions can also be made, mainly thanks to the button on the main panel
"No Collision".
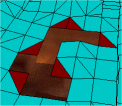
So how to do it? I will describe the procedure using the image on the left. First, shape the exact shape of the pit before you connect the rooms.
Where you want a diagonal passage, raise one half and the one to be passed through will remain flat in the plane of the door.
Then connect the rooms, including the squares you just split in half. Press the button
"No Collision"
and use this mode to mark all diagonal transitions (only the halves belonging to the door - they will be marked in brown).
You must not forget to mark all these triangles from both sides, i.e. go to the room below it and there the same places
also mark from below. Note You will probably have a problem from below, that even there you have to break all these squares to mark them,
otherwise you will not create triangles. As a result, all triangles marked in this way will not only become transparent
(if you don't texture them) but they will also be passable. If you were
They didn't use "No Collision", Lara would normally go after them
she walked and would actually walk on air.
You must have noticed that you don't have to make only "holes" or doors between rooms rectangular or square.
Diagonal transitions can also be made, mainly thanks to the button on the main panel
"No Collision".
So how to do it? I will describe the procedure using the image on the left. First, shape the exact shape of the pit before you connect the rooms.
Where you want a diagonal passage, raise one half and the one to be passed through will remain flat in the plane of the door.
Then connect the rooms, including the squares you just split in half. Press the button
"No Collision"
and use this mode to mark all diagonal transitions (only the halves belonging to the door - they will be marked in brown).
You must not forget to mark all these triangles from both sides, i.e. go to the room below it and there the same places
also mark from below. Note You will probably have a problem from below, that even there you have to break all these squares to mark them,
otherwise you will not create triangles. As a result, all triangles marked in this way will not only become transparent
(if you don't texture them) but they will also be passable. If you were
They didn't use "No Collision", Lara would normally go after them
she walked and would actually walk on air.
Your levels for everyone
Any level you create is essentially for TRLE owners. However, when you create a folder
with the most necessary things for the level, you will find that it can work for absolutely everyone. I created on this basis
a kind of universal base of the game, into which all levels created in this way would fit. Just insert your own into it
level (.tr4) and script.dat, english.dat. The condition is that the script must be edited for the original title.tr4 from the original editor.
You can also create the whole base yourself with your needs and thanks to that anyone can play,
who has a computer that can handle TR4 requirements. So what does each level need? Some main folder that you name after yourself,
and into it the "data" folder with the logo and title.tr4 + your levels. The main folder must contain script and language files,
the startup file, or the setup file, for which you must specially modify the paths.
The disadvantage of this way of playing is not using ambient music. You could put them in a folder
"audio",
but it takes up so much space that it's silly to spread over the internet. However, with the use of the MP3 format, it is no longer so intractable.
So you convert the music tracks to this format and add a decompression program to the original wav format.
The player then just converts the sound and can enjoy the musical accompaniment.
Conclusion :
This concludes this mini tutorial for the TRLE editor. Miss Croft also mentions General Schedules in the original web guide.
This is nothing more than a description of the items and their OCBs. This description is also published on these pages.
If you have any questions or comments you can write them to my address (below) or directly to Miss Croft.
Most of the instructions are from Miss Croft and I have only made some corrections and additions.