TRLE Editor
tutorial for the official level editor
Lesson two
After we've discussed geometry, textures and shading, we'll move on to the more interactive part. These are nothing but objects and basic commands.
Objects :
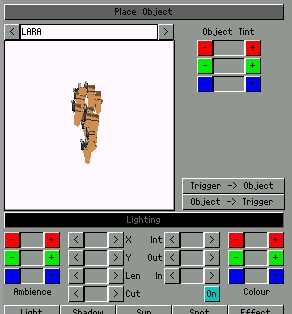 Objects have a very diverse role in TR and are distinguished by their properties. Each type of object is specific
and that's why it has its name so that the program knows what to do. Before I start breaking them down, let's learn how to work with them.
We will take only the upper part according to the picture next to it. Objects are selected from the list we have above the object preview (name LARA).
We can use the arrows to view and choose one by one, or we can click on the name and if we already know the names,
to select directly on the given name of the object. The object that is displayed to you is therefore active and has a button
"Place Object" take it
as if we take it into the mouse. By clicking on a square in the 3D environment or on the minimap, the object will be placed and there it will be in the game.
If we want to rotate the object, use the right mouse button. The height of the object can be moved using + and - at Floor,
but I enjoy the letters "W" and "S". So let's divide the objects into six groups:
Objects have a very diverse role in TR and are distinguished by their properties. Each type of object is specific
and that's why it has its name so that the program knows what to do. Before I start breaking them down, let's learn how to work with them.
We will take only the upper part according to the picture next to it. Objects are selected from the list we have above the object preview (name LARA).
We can use the arrows to view and choose one by one, or we can click on the name and if we already know the names,
to select directly on the given name of the object. The object that is displayed to you is therefore active and has a button
"Place Object" take it
as if we take it into the mouse. By clicking on a square in the 3D environment or on the minimap, the object will be placed and there it will be in the game.
If we want to rotate the object, use the right mouse button. The height of the object can be moved using + and - at Floor,
but I enjoy the letters "W" and "S". So let's divide the objects into six groups:
Lari objects
In the editor, we basically do not use, except for the Lara object, which I will start with. This object serves as information,
where Lara should be after starting the game (at the same time, it's also a record of all Lara's animations - which is irrelevant at this point).
Don't forget that filming also plays a role. Even though we didn't get to it, I point out that I don't have to come back to it again,
that all things (commands) that are to be run immediately at start-up are placed on the square with this object.
Other Lara objects are e.g. LARA_SKIN, LARA_SCREAM, LARA_* (etc.) and also
PISTOLS_ANIM etc.
Everything where you can see a preview of Lara's figure (mostly made up of only their thighs or other parts).
These objects only serve the game as a record of animations when using objects. They will be important later,
when you create your own objects, but for now we'll just skip them.
Objects for Lara's employment
That is, everything that needs Lara's direct activity. Levers, that's all SWITCH has in the name, they need for identification
Lari animations of some number in OCB. You can read the breakdown in the general schedules. This also includes locks -
all HOLE and pickups - KEY, PUZZLE_ITEM*, PICKUP_ITEM*, CROWBAR_ITEM, weapons and ammo.
Each object with multiple options has its number next to the name.
For example, if you put a lock with the name PUZZLE_HOLE3, Lara must push PUZZLE_ITEM3 into it.
For KEY_HOLE5, Lara must have KEY_ITEM5 and so on. I don't need to remind you that certain objects should be on the wall :o).
Special are the SHATTER* objects, which are used for Lara to break them by shooting. Pickups can be hidden in them,
but also bugs, for example. It is possible to activate the command when breaking them.
Enemies
Each enemy has a name, and where you place it, that's where it will appear upon launch. Again, I remind you that you have extended information in the general schedules.
Objects created by the game
You can't actually see them, because a kind of white-red pyramid appears instead of a preview.
These objects are written in the game, and the pyramid is only information that there will be something like that in the game.
They are things that could not be produced with a fixed structure and have, as I say, a head of their own,
i.e. programmatic :o). it is e.g. fire (FLAME), rope, steam, commands for enemies and the game, etc.
So you have to somehow imagine it in the program part and then try it in the game.
Animated objects
They usually have ANIMATING* in the title. They have a certain inactive state and when you start them with a command,
then something happens to them, some part of the rule moves. But animated objects are also doors - DOOR_TYPE* -
or some traps. But they always need an order to do that.
Static objects
Only to beautify the surroundings. They are FURNITURE*, ROCK*, ARCHITECTURE*, DEBRIS*.
They don't do anything, they just stand where you put them :o). Stairs that are usually in the ROCK category,
are given to increase according to the edge by 2 levels. The peculiarity is that it must be placed on a square
ceiling and then move to ground level. Under the stairs is textured in gray.
I will not analyze it too much, because you will gradually get to all the objects yourself already in connection with the commands. If you are interested in an object, take a look at the general breakdowns. If I forgot something, please contact me.
Commands :
A topic that I still have to discover. So I'll try to explain at least the basics.
We start from the description in the editor. Commands are highlighted in purple in the editor.
When we click on the text strip next to the purple button, a window like the one in the picture below will appear.
In blue I marked the type of command where we can choose what will be done, in green generally what it will be done on and
in red, specifically what it is about. I marked in yellow the already extended option, namely the timer, where you mostly have a length
duration of the command (good for e.g. timed doors).
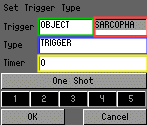 For the type of commands, I would start by analyzing the following: TRIGGER, ANTITRIGGER, SWITCH, KEY, PICKUP, HEAVY
For general substitution, we will only use OBJECT
for now
First, we click on the object with which we will do the command (in the mode without Face Edit, it turns red).
By default, it is set in the ribbon next to the purple button "TRIGGER for (object)".
If we don't want to use this kind of command, we have to click on the ribbon and set it to our liking. We will choose the commands so that
as we want, then we click on the square where we want to place the command and press the purple button.
You can double-check by clicking on the appropriate box on the minimap. The entire statement of the command will appear with the mouse,
which square contains Another click will show the second command (if there is one :o)) etc.
TRIGGER - It's a generic Lara-only trigger for everything. If it stands by itself on a square, it is activated by Lara's presence in the entire space above it, i.e. Lara does not have to just step on it, but it is enough to just jump over it. However, this command is used in most cases in combination with another. It is combined by putting multiple commands on one square and activating them all at once. So if we have "TRIGGER for (door1)" on one square and "TRIGGER for (door2)" and Lara steps on it, both doors open at once.
ANTITRIGGER - is the opposite of TRIGGER. If the door is already open, this will close it again :).
SWITCH - used to manipulate levers. This command will let the game know that the object in question is a lever to trigger something.
The command is created in the same way as the previous one, with the difference that we have to set the SWITCH type ourselves.
It stands to reason that this command cannot suck by itself, since we still need to determine what to do with that lever. I'd rather give an example directly.
We have a lever named SWITCH_TYPE2 and a door named DOOR_TYPE5 and we want to use that lever to open the door.
So we place both objects on the map and on the square with the lever we place the following commands on top of each other (in brackets I will write why this is so):
SWITCH for SWITCH_TYPE2 (information for the game that when activated by Lara, this should act as a lever...)
TRIGGER for DOOR_TYPE5 (... and open this door.)
The order of the commands doesn't matter, the important thing is that both of them will be on that one square under the lever.
Of course, you can also make three or more commands this way. At the same time, he can start a fire, for example, or close another door.
The possibilities are endless. In this case, when Lara flips a lever or presses a button (depending on what the object is),
so the given door will open for her. I'll stick with levers for a little while longer and throw in a note about levers.
Some levers that can be flipped back and forth can be flipped again to close the door again,
but I won't confuse you too much now and move on.
KEY - similar to SWITCH, only this applies to everything where something is inserted. We always put on the box with a lock in the form of e.g. "KEY for PUZZLE_HOLE10" and on top of that another command specifying what should happen to it. Nothing to add.
PICKUP - we don't have to trigger commands only with levers and locks, but also by Lara simply picking something up. And that's what this command is for :o). It is used in the form e.g. "PICKUP for SMALLMEDI_ITEM". On top of that, you give the command again, what should happen, whether it's launching an enemy or rolling out a ball. I just want to point out that if you want to use this command on anything other than a pickup truck laying on the ground, watch out for OCB. Check out the general breakdowns.
HEAVY - Well, let's finish this conversation with an activation command
object.
So it has exactly the same properties as TRIGGER, only it applies to objects.
I will not explain it in any complicated way and I will start directly. If you want something to open up after the farewell fire,
or an enemy appeared while moving an object to a certain place, this command will serve you.
Example: After spitting fire (FLAME_EMITER2), a skeleton will appear and a door (DOOR_TYPE1) will open.
Commands are placed on the fire square:
HEAVY for FLAME_EMITER2
TRIGGER for SKELETON
TRIGGER for DOOR_TYPE1
Now when Lara comes with the bow and lights this fire, a skeleton will come out of the ground and the door will open.
Another case is for moving things. There, commands must be given to the square where the object should be moved,
to activate everything.
So hopefully it's all understandable and you won't have any problems starting to produce meaningful levels.