TRLE Editor
tutorial for the official level editor
Lesson one
This is how we got to know the editor and its controls. Therefore, he can embark on some creative experiments.
Before we even start :
First of all, you need to realize a few things. If you don't want to just make pointless rooms,
you should have thought about what the level will cover. It is very important then for further selections.
It is necessary to know in which environment the level will take place, as this determines the choice of textures.
The textures are for individual levels in uncompressed TGA format units.
Samples can be found in the folder with sample levels (maps/level...).
The second thing that determines the environment is the objects. Objects are all objects and shapes,
which you cannot make in the editor grid. Object files are in WAS format and sample ones can be found in "graphics/wads".
So we have textures and objects and we can start.
We create a room, shape a grid :
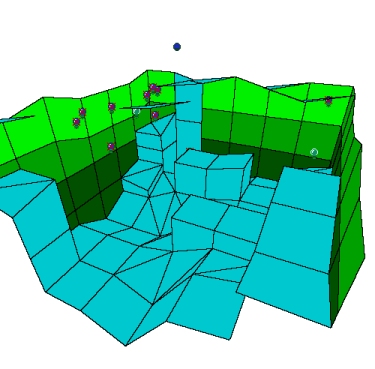 Each room consists of a grid. The grid has a certain number of squares (the ground) and rectangles (the wall from the start).
The ground grid must always be rectangular or square. So we choose the size of the new room by dragging the right mouse button
(turns red) and we put "Split Room". So we have a new room the size of our imagination and now we will give it shape.
The previously mentioned Ceiling and Floor buttons with pluses and minuses are used for this. If we right click on the square
(or once to the left) will be marked to us. With these pluses and minuses, you shape the ceiling and floor only by lowering and raising.
The default size for textures is four. For example, if you raise a square to level 4, a cube will be created.
Then if you press F5 and keep leveling up, you'll get another set of levels to use,
as I said, when texturing. But you can see in the picture on the left that the ends (top) can also be bevelled. When left clicking on a square,
possibly a marked sector, arrows of directions perpendicular to the wall of the square will begin to appear. when you put a plus/minus on a certain arrow,
the prism will be tilted in the given direction. Lara is sliding from the third level of bevel.
Each room consists of a grid. The grid has a certain number of squares (the ground) and rectangles (the wall from the start).
The ground grid must always be rectangular or square. So we choose the size of the new room by dragging the right mouse button
(turns red) and we put "Split Room". So we have a new room the size of our imagination and now we will give it shape.
The previously mentioned Ceiling and Floor buttons with pluses and minuses are used for this. If we right click on the square
(or once to the left) will be marked to us. With these pluses and minuses, you shape the ceiling and floor only by lowering and raising.
The default size for textures is four. For example, if you raise a square to level 4, a cube will be created.
Then if you press F5 and keep leveling up, you'll get another set of levels to use,
as I said, when texturing. But you can see in the picture on the left that the ends (top) can also be bevelled. When left clicking on a square,
possibly a marked sector, arrows of directions perpendicular to the wall of the square will begin to appear. when you put a plus/minus on a certain arrow,
the prism will be tilted in the given direction. Lara is sliding from the third level of bevel.


If you hold CTRL while clicking this, arrows will appear in the direction of the vertices of the square, allowing you to mow diagonally.
This will of course give new possibilities of shapes.


One important note is about making hills if you want to make it easier :o). For normal increment/decrement, add CTRL and you will increment not only one square, but at the same time everything around adapts so that "sharp edges" do not arise. The same works for diagonal bevels. Unfortunately, not for beveling in the direction of the edges.
Texturing :
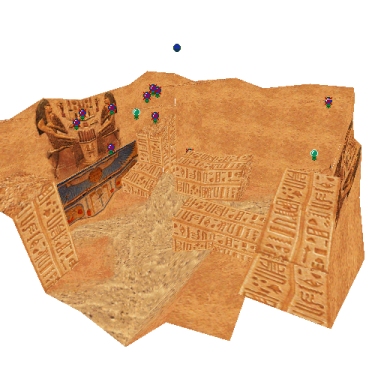 The basic texturing size is the so-called 4x4 and this applies not only to floors and ceilings. Try every shape if you can
divide (using F5, F6) into basic sizes so that your textures do not stretch - do not blur.
I mention this mainly so that you don't forget to do it near the walls. They have pluses and minuses and you get it
so you can divide it into a square grid. So you have a room ready for texturing and let's get started
by switching to "Face Edit" mode. Texture traditional squares by clicking on the texture and then clicking on the locations,
to which you dedicate this form. If the area is smaller than the texture, right-drag will select only part of the texture.
Another trick is when texturing beveled edges diagonally. There you have to follow the marked triangles on the texture.
The basic texturing size is the so-called 4x4 and this applies not only to floors and ceilings. Try every shape if you can
divide (using F5, F6) into basic sizes so that your textures do not stretch - do not blur.
I mention this mainly so that you don't forget to do it near the walls. They have pluses and minuses and you get it
so you can divide it into a square grid. So you have a room ready for texturing and let's get started
by switching to "Face Edit" mode. Texture traditional squares by clicking on the texture and then clicking on the locations,
to which you dedicate this form. If the area is smaller than the texture, right-drag will select only part of the texture.
Another trick is when texturing beveled edges diagonally. There you have to follow the marked triangles on the texture.
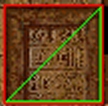 Green means always active and you are texturing with this part of the texture. Then click on the second part of the texture,
it will be marked in green and finish the chamfer texturing. So if you want to texture from another corner of the texture, just click.
It's a bit trickier when selecting smaller parts from the texture. The green triangle is always made in the corner where you start to drag.
I don't know how to explain it better, you have to try it :o).
Green means always active and you are texturing with this part of the texture. Then click on the second part of the texture,
it will be marked in green and finish the chamfer texturing. So if you want to texture from another corner of the texture, just click.
It's a bit trickier when selecting smaller parts from the texture. The green triangle is always made in the corner where you start to drag.
I don't know how to explain it better, you have to try it :o).
Of course, the texture can also be manipulated, such as rotating it - after placing the texture, right-click on it,
or mirror-rotate - after placing it, click on it while holding down CTRL - this is useful when texturing symmetrical images,
when you actually only have half (see the picture above - two figures sitting opposite, wings below them).
Shading :
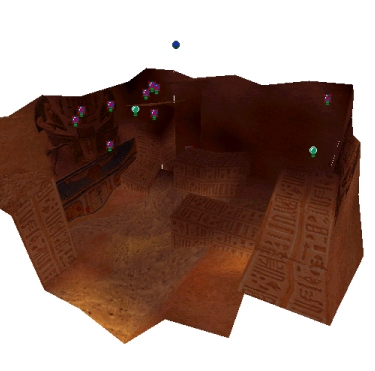 The shading of each room can be controlled by six elements: room color, light, shadow, sun, spot and effect:
of which each element has its own specific properties and is irreplaceable in its own way. A perfect interplay of colors and
shades is then a reflection of each designer according to how they are used and combined. So, as is clear from this,
perfect shading requires not only knowledge, but also talent, and it is literally a work of art.
There is no need to elaborate on shading methods, because it is an individual thing for everyone, but I will help you with the data,
which you should definitely know about these elements. To make it understandable, I will explain each feature
and to make it clear, I'll end it with a table.
The shading of each room can be controlled by six elements: room color, light, shadow, sun, spot and effect:
of which each element has its own specific properties and is irreplaceable in its own way. A perfect interplay of colors and
shades is then a reflection of each designer according to how they are used and combined. So, as is clear from this,
perfect shading requires not only knowledge, but also talent, and it is literally a work of art.
There is no need to elaborate on shading methods, because it is an individual thing for everyone, but I will help you with the data,
which you should definitely know about these elements. To make it understandable, I will explain each feature
and to make it clear, I'll end it with a table.
Color of the room - indicates the overall coloring of all textures and Lara when passing through. If you use Shadow, it will be tinted to that color.
Light - light source for textures, can be highlighted with a specific color. I personally hardly use it due to the greater possibilities of Spots.
Shadow - source of darkness. It has a very strong effect on Lara by turning black as soon as she approaches this source.
Sun - a wonderful effect for outdoor spaces. Where you place the sun, there will be automatic lighting for the whole area,
depending on the height of the location, also the range (meaning that if it is too low, it does not shine beyond the hill and also, depending on how big the hill is
almost accordingly the light also starts behind him). You can change the colors and the location, but beware: It also affects Lara and that
such that sunlight appears on her body. Unfortunately, I've found that wherever you place the sun,
on Lara, it always shines from only one side (I have the impression that from the south). Therefore, pay attention to the lights and shadows to the whole room
it was not lit, as if from the east and Lara from the south. (note: it is possible that this error (with that south) is not an error,
but it can be set somewhere, but I don't know where yet).
Spot - my favorite and therefore the most used widget. It is point lighting that has a direct effect on absolutely everything.
Its color and position can be changed and it is also very intelligent :o). It can do very nice effects with a wrapped surface
light and especially these lights play nicely with Lara. Then it seems more plastic and real in that room.
Effect - interesting function. It has an effect only on textures and serves to finish the gaps of other elements.
It can create spot shadow and light only where it was placed regardless of its later height level.
Shading panel
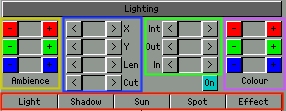 red - selection of elements;
yellow - room color;
blue - light position;
green - intensity;
purple - element color
red - selection of elements;
yellow - room color;
blue - light position;
green - intensity;
purple - element color
The Lighting button toggles between shading and texturing modes.
Attention: I recommend placing shading elements in basic mode (ie without Face Edit) due to
that it then remakes the given section for you on the marked texture.
