TRLE Editor
tutorial for the official level editor
Editor description
First of all, it will be good to know what the entire editor consists of, what files they contain and how to proceed during creation.
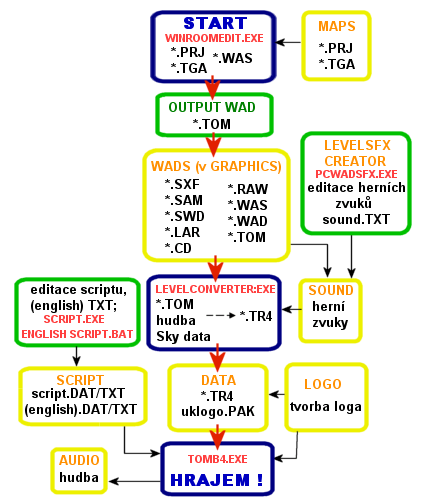 Legend :
blue - programs,
green - actions,
yellow - folders,
red inscriptions - programs,
orange inscriptions - folder names,
red arrows - basic creation process,
black arrows - extended options.
*.PRJ - project file
*.TGA - textures
*.WAS - objects
*.TOM - contains all the information needed to convert
*.SFX - game music
*.SAM - more music
*.SWD - (I don't know, but it's "Sprite Wads" in the original)
*.LAR - Lar animations
*.CD - information about the music used
*.RAW - graphics of the sky
*.WAD - information about objects and animations
*.TR4 - all finished level
As you can see from the image above, this editor uses a lot more source files than the DXTre3D editor. The continuity and level creation procedures are also very clearly displayed. It may seem much more complicated than the DX editor, but it is not so. Base Level is needed to create a level anyway. However, it is not made up of a *.TR4 file here, but several files, each of which contains only some components of the level. As for the textures, there is nothing different. Using so many files has some advantages over the DX Base Level. Mainly, it is easier to edit individual parts and combining them. It is also very easy to edit SFX sounds, which are located in a special directory and they are added only when the level is compiled.
Description of the editor window:
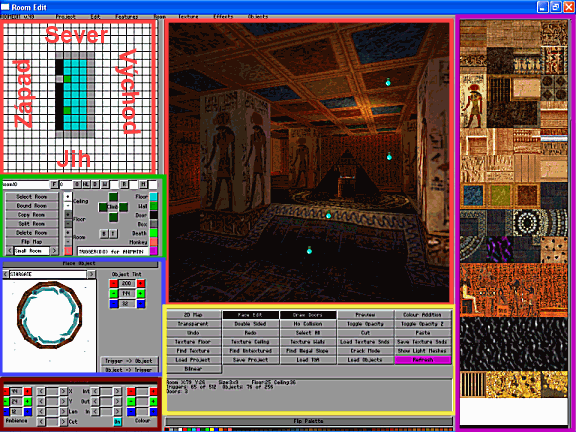
Grid (red): We can see this twice. As a map in the upper left corner and in the middle, as a 3D environment, in which we work. while the sides of the world in the game are always determined by a small map in the corner. It is used for a clear view of the room with drawing all important points and color resolution of individual functions. The 3D environment enables easier modeling of space. I just want to point out that everything that can be done in a 3D environment can also be done through a small map. Later when you're higher up level in editing, you will use this small map more and more often, for the sake of saving time and greater clarity.
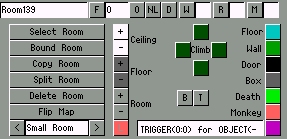 Grid and Room Control (Green): This is located just below the room map. On the first line is the name of the room,
flipping "F"; "O" toggles the wind in the room; "W" water. Roomy: Select - displays a list of rooms,
Copy - creates a duplicate of the room you are in, or a room only from the selected one,
Split - cuts out part of the room (marked). Next to the columns with pluses and minuses - Ceiling - moves (increases, decreases)
the ceiling of the marked sector; Floor - moves the floor back. sector; Room - moves the level of the room.
Next is Climb, which will create a "ladder" on the corresponding wall and then nicely colored buttons (for clarity on the map)
blue Floor and green Wall - turns the wall into a floor and the floor into a wall; black Door - creates a passage between rooms;
gray Box - controls the movement of enemies on the map; stamping Death - if Lara steps on this space,
a merciless death awaits her; orange Monkey - will create the possibility to follow the trail on the ceiling of the marked sector.
Purple - this is the command button that makes the game a game :o).
Grid and Room Control (Green): This is located just below the room map. On the first line is the name of the room,
flipping "F"; "O" toggles the wind in the room; "W" water. Roomy: Select - displays a list of rooms,
Copy - creates a duplicate of the room you are in, or a room only from the selected one,
Split - cuts out part of the room (marked). Next to the columns with pluses and minuses - Ceiling - moves (increases, decreases)
the ceiling of the marked sector; Floor - moves the floor back. sector; Room - moves the level of the room.
Next is Climb, which will create a "ladder" on the corresponding wall and then nicely colored buttons (for clarity on the map)
blue Floor and green Wall - turns the wall into a floor and the floor into a wall; black Door - creates a passage between rooms;
gray Box - controls the movement of enemies on the map; stamping Death - if Lara steps on this space,
a merciless death awaits her; orange Monkey - will create the possibility to follow the trail on the ceiling of the marked sector.
Purple - this is the command button that makes the game a game :o).
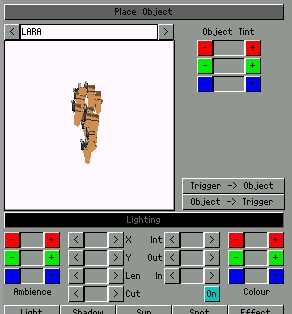 Objects (blue) a
shading (brown): Use the arrows to select an object that will always appear in the preview below the selection
(it can also be manipulated - hold the left button - rotate; hold the right button and move left/right -
scrolls the preview up/down; hold the right button and scroll up/down - zoom in/out the object in the preview)
and then click the "Place Object" button and then click on the grid to place it. The buttons in the lower left corner are for shading,
such as the color of the room, intensity, color and placement of lights, shadows, sun, light points...
Objects (blue) a
shading (brown): Use the arrows to select an object that will always appear in the preview below the selection
(it can also be manipulated - hold the left button - rotate; hold the right button and move left/right -
scrolls the preview up/down; hold the right button and scroll up/down - zoom in/out the object in the preview)
and then click the "Place Object" button and then click on the grid to place it. The buttons in the lower left corner are for shading,
such as the color of the room, intensity, color and placement of lights, shadows, sun, light points...
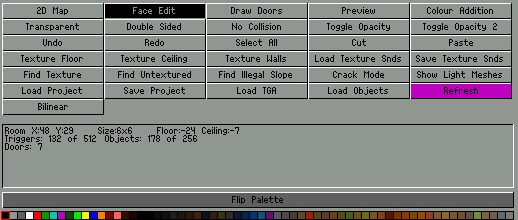
Main panel (yellow): How else to name this panel. So I will briefly describe it to you and when I get to it later
to individual actions, I will describe each function in more detail. In the first line, we start on the left, with the button "2D Map" you switch to the mode,
where you connect the rooms and it gives you a complete overview of all the rooms and their location. "Face Edit" switches to
room texturing mode. "Draw Doors" will remove the "membranes" in the doors for you when viewing a room in 3D and you can see
even to the next room. "Preview" is a mode where you can freely fly through the rooms (gets rid of the spacebar). I point out
that this mode is very graphic-intensive, so save everything before trying it. "Transparent" creates transparent
(semi-transparent) textures (to be used later). "No Collision" is used to create irregular (non-square) doors
(more details later). "Toggle Opacity (2)" makes a permeable (impermeable) membrane to the door, to place the texture.
Texture Floor/Ceiling/Walls - textures the entire floor/ceiling/all walls with one (selected) texture. "Find Untextured" -
finds any untextured spot on the map. Load/Save Project - Loads, saves the project :o). Load TGA/ Objects - Loads textures/objects.
The status bar below this panel is information about the room's position, size, number of objects and commands on the map, number of doors in the room.
And the last thing is the textures (purple) - in the right sidebar.
Images used from the level "Hall of Rebirth" by MissCroft.